Eye tracker in VR with SRAnipal
It is possible to use the eye tracking system of the HTC Vive Pro eye headsets thanks to SR Anipal. The purpose of this page is to show how to set up the SRAnipal system in MindDev.
Several steps are required before the eye tracker can be used directly in MindDev:
- Make sure SteamVR is installed.
- Install the SR Anipal SDK
- Configure SteamVR to allow the Eye Tracker to be used.
- Configure your MindDev protocol
Installing SteamVR
First of all, MindDev relies on SteamVR software to run VR. A dedicated installation page is available here
Installing SRAnipal

You then need to install SRAnipal to enable the eye tracker to be used in MindDev. To do this, you need to download the SRAnipal version of the SDK from the official VIVE website or mirror it on this link
Installing the SRAnipal SDK does not activate the eye tracker at every launch. To use the eye tracker, you need to launch the SR Anipal application before launching MindDev. A single launch is required for the entire MindDev session.
Once SRAnipal has been initialised, the logo appears in the Windows status bar and changes colour:
| Colour | State |
|---|---|
| Black | Eye tracker not detected |
| Orange | Eye tracker detected but not initialised |
| Green | Eye tracker working |
In case of installation problems
In the event of an installation bug or configuration problem, full documentation is available here:
https://github.com/Tomaso-Zanardi/SRanipal-Eye-Tracking-Manual/blob/main/README.md
Activating the eye tracker in Steam VR and calibration
When the SRAnipal SDK is active, you need to modify the SteamVR configuration to activate eye tracking. To do this, go to the SteamVR options for the HTC Vive Pro headset and follow the on-screen instructions.

The SteamVR options panel allows you to perform a calibration of the eye tracker. This calibration takes place, headset on, in just a few seconds.
Configuring your protocol in MindDev
In MindDev, only a few configuration steps are required to use the SRAnipal eye tracker:
- Add a specific management entity
- Add an eye tracker data recording entity
- Add points of interest
- Add, if necessary, a calibration instruction
Eye Tracker Device entity
To establish the link between MindDev and the eye tacker, only one entity is required. This is the ‘Eye Tracker Device’ entity. This entity has no parameters and only one purpose. To enable communication with the SRAnipal sdk.

Entity for recording eye tracker data
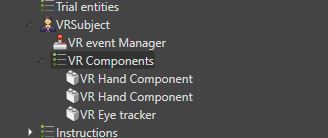
To record data from the eye tracker, a specific component needs to be added to the Subjet system. In fact, the component is not a conventional entity, and will only be available on the subject's VR components:


This component will take care of recording the available eye tracking data:
- Eye position in the universe
- Direction of the eye in the universe
- Direction of the eye in the local reference frame
- The aperture value of the left eye
- The aperture value of the right eye
- The area of interest looked at
- The impact point in world coordinates
Defining zones of interest
It is possible to define areas of interest in the 3D environment, or even in the ‘2D’ environment if it is positioned in 3D space. In fact, it is possible to declare the object as an area of interest using the ‘Area Of Interest’ script.

By adding the zone of interest declaration script, it is possible to assign an integer value other than -1 (the value of -1 is the default value when no zone is overflown by the gaze), which will be recorded by the eye tracker controller as a gazed zone of interest.
Add a calibration instruction
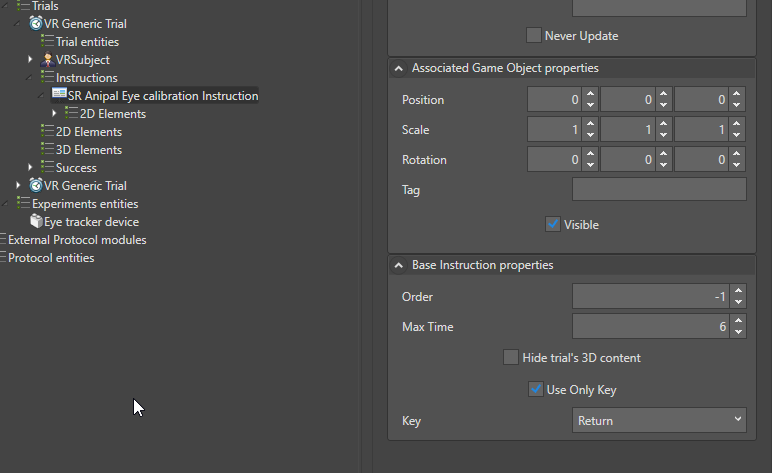
MindDev supports calibration during handover. The specific SR Anipal Calibration Instruction enables eye tracker calibration using the SRAnipal SDK calibration software.

Surprisingly the instruction has a time and a validation key. The validation key (a key on the keyboard) is used to pass the instruction. In fact, we can dynamically launch the calibration but we have no information as to whether it was successful. We don't know when it ends. MindDev therefore has a keyboard key that automatically stops the instruction in progress and moves on to the next one.
This allows the operator to start his protocol when the subject tells him that the calibration has been completed.
SRAnipal Instruction
Warning, the instruction does not continue without action from the operator. The result is a pending protocol, which may give the impression of a crash or malfunction.